Creating Custom Audio with the REALWELD System
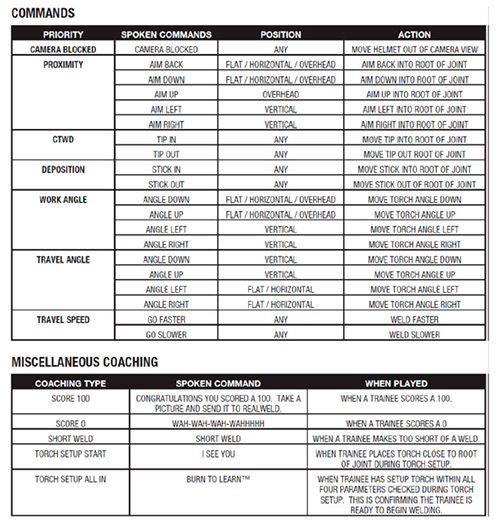
| The REALWELD® Advanced Welding Training System provides instant audio feedback on student welding performance. This capability is delivered by a voice nicknamed ‘Audio Allie’. The list of ‘Audio Allie’ commands and feedback comments can be found on a previous Tips and Tricks, ‘Audio Coach Allie Cheat Sheet’, and can also be found in the RealWeld® Instructor Manual.
Instructors at your school may choose to change the voice for the commands, replace the command verbiage, or possibly even the command language. Please note, the only language currently provided for audio is English. Switching languages at the login screen with the current software will only change REALWELD® text. Changing the audio files can be accomplished on the REALWELD® System by recording your own file commands, creating a new audio folder, and switching to that folder. This Tips and Tricks document will explain the steps required to create and select custom audio. CREATING CUSTOM COMMANDS:
|
| It may be easier navigating thru the desktop with the use of a USB connected mouse device. Available USB ports can be found on the REALWELD® control box.
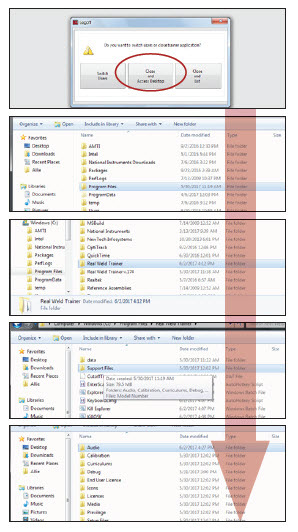
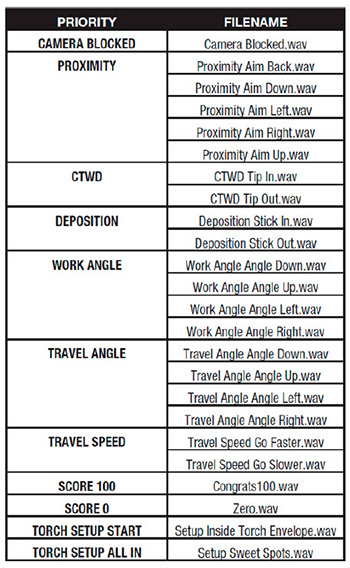
STEP 1.Access the audio folder on the REALWELD® System by logging in as an instructor, and then pressing Logout. When prompted, Close and Access Desktop. Access the C: driveby pressing DO NOT REMOVEAllie from the Audio folder. Allie should continue to be made available as the default audio voice. STEP 2. On a separate recording device,record or convert recordings of the desired commands into a “.wav” format. You can create a different voice, language of the command, or even the command itself. For example you can change Allie’s ‘Work Angle Angle Down.wav’ command of “Angle down” to a new command “Less Work Angle”, or even change the audio to the Spanish translation of a similar command. Once again, make sure the ‘Save as’ type is set to wav. Below is the list of the current ‘Allie’ spoken commands and how each are applied. STEP 3.Following the creation of each individual file,rename all of the new commands exactly as seen below in the ‘Filename’ table(also found in Instructor Manual). The REALWELD® system must see this structure to operate. |
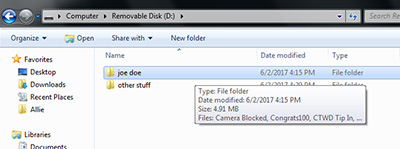
STEP 4.Create and name a new folder. For example, you could call the new custom voice and commands ‘Joe Doe’. Copy and paste all of your new commands to this new folder.
STEP 5.Transfer the custom folder on to a USB flash drive. Insert the flash drive into one of the empty USB ports on the REALWELD® control box.
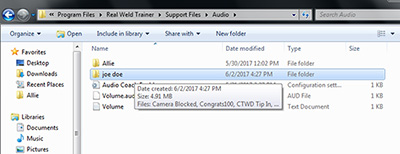
Locate andcopy the new audio folder from your removable disc. Access C:drive \Program Files\RealWeld Trainer\Support Files\Audio
Paste the new audio folder to the directory. Keep the Allie option. Exit and restart REALWELD® software.
Now that you have created the new folder you will need to switch from Allie.
ACCESSING CUSTOM COMMANDS:
STEP 6.Login to the Instructor Menu by using an instructor login. The Sys Admin folder can only be accessed from the Instructor Menu.
STEP 7.Press ‘Sys Admin’ Login and login using your System administrator login name and password.
The system login privilege can be accomplished by creating a new user and designating that user as the System Administrator (can be both Instructor and System Administrator).
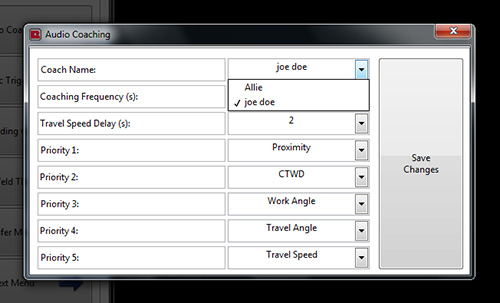
STEP 8.Press the top option on the System Administrator menu ‘Audio Coaching’.
Find and select your new folder from the dropdown box. Save Changes.
Close the Sys Admin folder.
SAMPLE THE NEW CUSTOM AUDIO:
STEP 9.Logout of the Instructor Menu. ‘Switch Users’ and login as a trainee.
STEP 10.Set up a weld with ‘Audio Coach On’. Create the weld with either Arc On or Arc Off. Audio Allie audio cues will now be replaced with the new custom voice and commands.
Creating Custom Audio. Just another way to insure the REALWED® Sytem wil fit your schools’ program.

