Creating a Tolerance Set
by Chris Gandee
The VRTEX® 360 is designed with a default tolerance set including welding parameters, welding technique and more based on the Lincoln Electric Welding School welding training methodology. To provide users with flexibility, the VRTEX® 360 also offers the opportunity to create custom tolerance sets.
We hear from some users that they have been hesitant to change tolerances on their VRTEX® 360 system. This may seem daunting at first, but creating a “Tolerance Set” is easy to do and a great way to customize your VRTEX® 360 to your curriculum or the training methodology employed by your school. By changing Tolerance Sets, instructors train students to how they weld, reinforce proper equipment setup, and change how easy or challenging it is for students to get high scores.
Each Tolerance Set stores the proper equipment settings (e.g. voltage and wire feed speed), technique (e.g. straight weave or stringer), and technique application (e.g. gun or electrode distance, speed, and angle from the workpiece).
The Lincoln Electric VRTEX® 360 software, developed in partnership with VRSim™, was designed to prevent users from customizing the default tolerances. No matter what you do with your own Tolerance Sets, you can always go back to the Lincoln Electric “Default Settings.” These are your safety net.
Now that you understandTolerance Sets, you’re ready to make your own. Here’s how you do it.
1. From the sign in screen, turn the instructor key a quarter turn to the right to access the “Instructor Mode.”
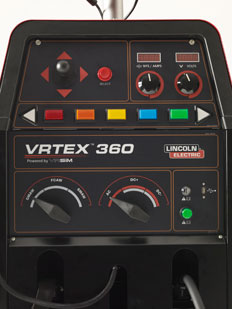
2. Once in the Instructor Mode, move the joystick to highlight the “Tolerances” box.
3. Select this box by pressing the red “Select” button.
4. Press the “Edit” button (the yellow button on the front control panel) to bring up the Edit menu.
5. Move the joystick up and highlight the “Create New” box inside the menu.
6. Press the red select button to select “Create New.” This will take you to the keyboard screen.
7. Use the joystick and red select button toggle through the letters and numbers and create the desired name of the new Tolerance Set. Your Tolerance Set name could include such information as the instructor’s name, the course name and number, and if the scoring will be easy, medium, or hard.
8. Once you have named your Tolerance Set, press the green “Continue” button located on the front control panel. This will take you back to the Instructor Mode screen.
9. Move the joystick left or right to toggle through the Tolerance Sets. Once the newly created Tolerance Set is in the “Choose Tolerance Setup” box, press the red select button to select that Tolerance Set. This Tolerance Set will now be used by the system.
10. Next, press the green button on the front control panel labeled “Customize.” This will take you into the “Joint Selection” screen.
11. Use the joystick, red Select button and green Continue buttons to choose the desired joint you want to change as well as the material thickness and process you want to change.
12. After these selections, you will be ready to change specific tolerances. To toggle through the tolerance screens, use the white triangular buttons located on the ends of the front control panel.
13. Once you find the desired tolerance you want to change, use the joystick and red select button to select it.
14. The current tolerance number value (e.g. “375” inches per minute for wire feed speed) is located in the box on the right. Move the joystick up or down to increase or decrease this number.
15. Once you have your desired number, press the “Set Tolerance” button (the green button on the front control panel).
16. Repeat steps 13-15 for any other tolerances you wish to change.
17. If you wish to change what coupon or process you are editing, press the red Menu button and select the applicable setting.
18. When you are done, press the red Menu button, move the joystick up to select the Logout option, and press the red Select button. This will bring you back to the student log in screen.
Note: If you get into the weld you changed and nothing seemed to change, go back into the “Instructor Mode” and verify that the tolerance set you want to use is listed next to the “Current Tolerance:” in the upper left. If not, use the joystick to highlight the “Tolerances” box, press the red Select button, and follow step 9 above.

